
Edit a page - Step 3.3

First you can choose if you want to insert an image which is already available in the system, or if you want to insert an image which has to be uploaded first. Finally it is also possible to manually enter a URL of an image which for example is located at an external website.
If you choose to insert an image which is already available in the system, you will be shown the tree view of "Image Management". You can pick the thumbnail of the image you want to insert.
If you choose to insert an image which has to be uploaded first, you will be asked for the destination folder. After that you can select the image which has to be uploaded, and you can enter its title. Uploading images is described extensively the chapter "Images".
If you choose to enter a URL manually, you will be shown a text box in which you can enter the location of the image, like "http://".
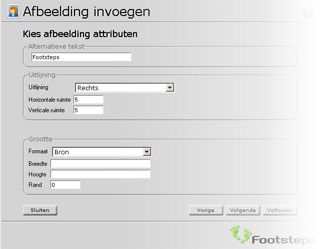
Alternate text - This text replaces the image if the browser of the visitor doesn't render images. You can think of specific browsers for visually impaired persons.
Alignment - Aligning determines where the image is located with regard to the text. For example, you can align the image left or right. This way the image will be placed at the specified side of the page, and the text will float around the image.
Horizontal/Vertical spacing - This is the space measured in pixels, between the image and the text.
Size / format - If you control an image inside "Image Management", you can specify a size type. This determines the default sizes of an image. This way the size of your images can be consistent throughout your entire website. The size type "Source" is the original image as you uploaded it. But mostly, this size type is not what you want.
Width / Height - If necessary, you can use these properties to adjust the size of the image manually. However, we recommend you to use the sizes specified inside "Image management" instead. Width and height are specified in pixels.
Border - You can use this property to specify a border around your image. You have to specify the border size in pixels.
Change image
Deleting Images
Generally, an image behaves like text. Therefore you can delete it in the same way as you would delete text. However, because of alignment of the image, the exact location of it can be a little difficult to find. If that's the case, it may be easier to simply leftclick the image and push the delete button of your keyboard. This will also delete the image. After removing images from your webpage, they will still be available within "Image management" (off course, if they were present there in the first place).